Please help me win the Martha Stewart Viewer's Choice Award... click on the link or badge below, sign in with your Facebook account (if you have one) or register with an email of your choice. You can vote 6 times per day each day until September 13th. THANKS SO MUCH!!!!
Wednesday, August 28, 2013
Saturday, June 22, 2013
My new sweetgrass plants... 1 month later!
THE BEFORE SHOT - May 23, 2013
Remember the sweetgrass plants I planted one month ago? Well, we've had a lot of rain here on Long Island this past month with just a couple of days that resembled spring or summer. I have given these plants a sprinkle of blood meal and bone meal twice this past month, as well as, some liquid fish (yucky stuff)... I think I've been successful so far... what do you think?
They have grown pretty well and look strong. The most amazing thing that has happened is not only are my new plant looking great, but I put the same food recipe on my old sad looking container of sweetgrass, boy was I thrilled!!!
This bucket of grass I have been growing for several years and the blades were never bigger than 12" long after a full growing season... that is why I bought new grass plugs... I guess I'm going to have a lot of braiding to do this winter!!!
Wednesday, May 22, 2013
My New Sweetgrass Plants are Here!!!
My new sweetgrass plants arrived this past Friday and I couldn't be more thrilled with them! They came from Redwood City Seed Company in California.
I bought 6 plants, but to me they were more like plugs... much more than I had expected and were packaged very well. They also came with very clear instructions for planting. So, off to the garden center I went to buy potting mix, bone meal, blood meal and liquid fish fertilizer...
So, while my plants were soaking in the liquid fish solution, I put planting mix in the pots... added bone meal and blood meal...
There is about a 1' of space around the plants and these pots will sit on my deck railing. We had a gentle rain most of that day and the next, so they were off to a pretty good start... I hope. With weekly feedings, the planters should be pretty full of sweetgrass by the end of the summer, yeah! Wish me luck...
Labels:
basket grass,
sweetgrass,
sweetgrass baskets,
vanilla grass
Sunday, May 06, 2012
Paper Weaving Flats
 |
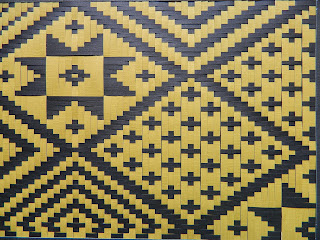
| Cherokee Twills 16" x 20" cardstock paper |
As a seasoned weaver or even a novice one we all see patterns in baskets and cloth that we would like to try and weave. The problem is that sometimes I don't want to weave a whole basket or the materials would cost too much to "play", so paper strips are relatively affordable. Cutting the strips is fun, too. Office document shredders used to be my cutter of choice and if you can find one that cuts 1/4" strips GRAB it... a pasta cutter is used by some and will cut 1/4" and 1/8" strips, but I cut mine with a rotary cutter, strip by strip, and can cut any width that I need.
So how do I come up with a design? Well, in the case of the Cherokee Twills above, I did see a picture online of the bottom of a basket with this twill pattern and thought it was too pretty to be hidden in the bottom. It was clear enough to get a "read" on the pattern on the star in the upper left, so I started at that point and faked it from there... all widths are 1/8", done in black and harvest gold, placed on a black and white mat in a clear glass frame. Pretty striking in person!
 |
| A close up view... |
Could I stop there? NO! Weaving with just strips of paper is methodical and relaxing. I get so "lost" in the weaving that time really does fly when you are having fun. Unlike traditional basket weaving, I can do this if front of the TV, on the porch, and can even get a few rows done while cooking. LOL, I get so lost that I forget I'm cooking... a.k.a. burnt food.
The next thing I wove was for a class in 2009 NCBA Convention in North Carolina. It is called Nothing but Diamonds. The folks in this class were awesome and kept me laughing the whole day. The idea started with the center panel with the biggest diamond... then what would it look like if a couple of strips were removed... and so on... the diamonds decreased in size all the way down to a simple cross. It was woven from the center out in each direction. Very easy... yes, I mean easy, but the results are cool.
 |
| 2 over 2 under twill in multi colors |
 |
| brick red and white with color breaks in the center |
 |
| Undulating Twill |
 |
| Checkerboard Gameboard Style
So, why don't you try your hand at a little paper weaving! Kits are currently available and will be posted to my Etsy shop, this week...
|
Sunday, April 22, 2012
Lavenders and Blues
The Williamsburg Door or Wall Basket is all dressed up for spring moving from the bright yellows and whites of Easter into the early spring colors of lavenders, blues, pinks and purples. As the decorating themes for the months and seasons change, I will send you different ideas to keep your basket fresh and exciting and to make sure everyone feels welcomed to your home. Today I will show you how to fill your basket with blues and lavenders. You may still keep some of your Easter blooms if the colors fit the theme, but I used just 3 bunches of flowers that were on sale at Michael's. I add a couple of dark purples to move my basket-scape into early spring. So, let's get to "planting" your basket and the best part is dirt is not required!
You will need styrofoam, 1/4" wide smooth ribbon, a bit of shred, 3 floral picks, a piece of plastic 1/4" wide by 8" long, and of course, your basket... the foam and shred you will have already, if you bought a kit or basket from my Etsy shop. I cover the foam with plastic, a grocery bag works nicely here... it keeps the styro crumbs from getting all over the place. Slip this into the basket and cover it up with shred. If the picks are very full of blossoms, you may only need to bend the bottoms and tuck them into the basket and they may hold themselves all nestled together.
I cut the stems into individuals picks... it makes them easier to "plant" into the baskets and makes this fun, quick and dirty. Dirty, but Anette, you said "no dirt required"? Well, then that makes this design just plain quick, yeah ;^)
Try to work in odd numbers to keep your eye from naturally dividing the basket in half... I added one big hydrangea bloom just to the left of the middle... place 5 lavender blossoms around it... then 1 blossom to the left and 5 to the right of the hydrangea... I have some pipberry branches in a creamy white hanging around so I added them too... I just can't stop, it is so much fun.
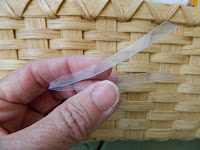
The hardest part to decide, I think, is how you want to place the ribbon... should I go around the basket for 3 rows as if it were dyed reed or just make a simple bow or add a few ribbons of color to the front... well, I went with my third choice. This IS supposed to be quick after all. Bend the piece of plastic in half, cut to a slight taper, slip under a weaver, insert the ends of the ribbon inside the plastic, then pull on the plastic "needle" to help guide the ribbon through the weaving... pull then ends through the loop and tighten... make two more ribbon loops and you are DONE!
Hope you like your Williamsburg Door Basket Makeover for April!
Happy Weaving...
WHAT, you don't have a Williamsburg Door Basket?
The completed basket, the very one you see here will be available at my Etsy shop in a day or two,
but kits are available (if you are a weaver) or just the basket so you too can join the fun and make over your basket every month.
Leave me a comment below and let me know
what you would like to see for this basket!
Wednesday, January 25, 2012
Bells, bells and more bells!
Bells, bells and more bells! That's right, it is time to gear up for the Spring Gathering basket weaving convention in West Springfield, Mass. This weaving weekend is sponsored by the Northeast Basketweaving Guild and is just a delight to be there, both as a teacher and a student.
Two classes I am honored to teach are the small and large Nantucket Bells. I'm preparing to put a nice gloss finish on the bell tops and rims... the easy part... THEN the fun begins when it is time to cut all the staves, bevel and taper them. OH yes and write the pattern too. The gathering is in April so I best get started now... want to see what they will look like when completed... here they are, hope you like them!
Subscribe to:
Posts (Atom)


